Warning! PLEASE NOTE: The information presented here is intended only for the purpose of helping motorcyclists to better understand their braking systems. It is not intended in any way to be a substitute for professional mechanical advice. Only a qualified and trained mechanic who has been able to personally inspect your braking system can provide recommendations for work. Brakecrafters accepts no liability for damage, injury or death.
Motorcycle Caliper Piston Removal, inspection and information
One of the most expensive parts of a motorcycle brake caliper rebuild can be the cost of caliper pistons and this part of hints and tips will be about the causes and also ways to help prevent both damage and corrosion to these valuable components.
There are only two ways for motorcycle brake caliper pistons to fail and become useless, firstly corrosion which can be caused by environmental factors such as road salts and neglectful cleaning practices. Another important environmental factor in this area is failure in regularly replacing brake fluids. This itself is probable the greatest cause of corrosion within the motorcycle brake caliper.
Now I am sure that I am like many people and really stick to rule “Well if it ain’t broke, don’t fix it!” and you will never begin to feel the moisture building up in your brake fluid as the process is very gradual and you will never feel that fraction of sponginess in the lever until the moisture level is extremely bad but while the system holds this moisture it’s busy destroying your brake system from the inside.
Common motorcycle brake fluids are all glycol based and are hydroscopic (meaning absorbs moisture from the atmosphere) and as soon as you open that bottle of brake fluid it’s drawing water from it’s environment. The Fluid will also attracts moisture through microscopic pores in hose and past brake seals and master cylinder tops. This problem is worse where you are in locations wherehumidity is high. An NHTSA survey found that the brake fluid in 20% of 1720 vehicles sampled, contained 5% or more of water!!! Apart from the damage caused to your brake system by water contamination, the boiling point of your fluid drops drastically. DOT 4 fluid, which has a higher minimum boiling temperature requirement (446 degrees F dry and 311 degrees wet) soaks up moisture at a slower rate but suffers an even sharper drop in boiling temperature as moisture accumulates. Three percent water will lower the boiling point as much as 50%!
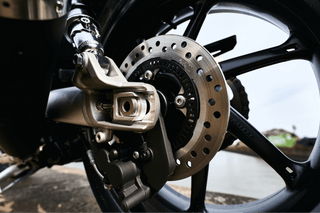
But we are here to talk about the corrosion. Many of the Nissin and Tokico motorcycle calipers use pistons that are steel with a chrome plating to give it the smooth mirror finish for pistons to glide along the seals, but with time they will begin to become pitted by corrosion and as they pit they will flake off the chrome coating, causing friction of the piston to caliper (pistons not being pushed out or retracting correctly)(See fig. A)
 (fig. A)
The other type of corrosion is at the top end of the caliper pistons (brake pad end) and because there protrude out while especially when the pad level is low allows them to pick road salts, dust and dirt which in turn hold the moisture against the piston surface again allowing corrosion to occur. (See fig. B)

Another issue here, is the use of pressure wash cleaners and also certain detergents that affect aluminium and also high pressure jets forcing the water into the seal rings and beyond. As brake calipers accumulate brake dust and dirt it is common to just pressure wash the hell out of this area and again not intentionally but this can damage your calipers.
Recommendations:
- Clean calipers with dish soap and brush and hose only
- Change brake fluid at least annually with DOT 4 and more frequently in humid climates or if used for racing/track days.
The second greatest cause of caliper piston replacement is incorrect removal of the pistons and after brake fluid moisture corrosion, I believe this to be the second biggest destroyer of pistons!
As seen in the image below, seven of the eight pistons were rendered unserviceable by the bad way that the so called ‘mechanic’ had removed the pistons. (NB: He was not a mechanic but removed pistons as part of re-powder coating the calipers!) Unless you have no intention of using the pistons again, never use grips to pull the pistons out!


The best way to remove pistons is by ‘pushing’ them out. Now I have heard (and tried myself) to use compressed air, however the warning is in the description “compressed” . If the piston is stuck the air will compress and if you just increase the pressure the greater the release! Yes we’ve had the stories of broken fingers and holes in the side of the wall! Fluid’s do NOT compress and our recommended way for removing pistons is as follows:
It generally only takes 5 minutes to connect the single rear brake hose and bleed the system, so you are able to have the pressure to push the pistons out, this is also in an easy area to allow you to operate the rear brake pedal as opposed to reaching up for the handlebar lever. The other item you will need are ‘shims’ to allow the pistons to be pushed out equally (not needed for single piston calipers). For most two or four piston calipers I use the following: 6 steel shims 4” by 1.5” and 1/8 thickness (I got a strip of steel from Ace Hardware for $9 and cut into 4”sections)

Caliper connected to rear brake hose
 Shims inserted
Place the shims into the slot and pump the rear brake and I’m sure you will see one of the pistons coming out quicker than the other! Keep the pistons coming out equally by removing the shims one by one as the pistons push out equally (make sure you’ve topped up the brake fluid in the rear master!) as you pump the rear brake, you will eventually feel the pistons just come past the pressure seal (piston goes slightly crooked) but make sure you’ve got this as evenly as possible so that both pistons achieve this status. With this done, the pistons will easily be removed by just pulling and wiggling with your finger and thumb. Make sure you have a catch tray as fluid will fall from the brake caliper. Repeat process with other calipers you are refurbishing (NB: Sounds obvious but do the rear first if you are doing all the brake calipers!)

Pistons pushed out on shim (Last one shown)

Last shim removed - pistons ready to be pulled with finger and thumb

Easy!
Full video: https://www.youtube.com/watch?v=smtgVDEibUw